Y# Specialisations
Overview
The ability to specialise not only pipelines but also connectors is one of Variant's key strengths, particularly when combined with extension packages that can be shared across multiple projects. Specialisations enable developers to encapsulate standardised functionality—like JWT generation, validation, or complex logic chains—into reusable, self-documenting components.
Specialisations come in three forms:
-
Pipe specialisations
-
Process specialisations
-
Process specialisations with implementation injection
We’ll explore each in detail, along with a deeper dive into the replacement/default mechanics and common pitfalls.
[!Note] Versioned local extension packages are ideal for storing reusable specialisations such as shared queue handlers, blob storage utilities, or API clients.
Pipes and strategies
Before we look at specialisations we should have a look at exactly what pipes and strategies are in Y#. We'll do this by looking at definitions of the following pipes through to how they are combined to create pipe specialisation
ModifyMessagePipeModifyMessageStrategy
ModifyMessagePipe Definition
- key: Variant.Core.ModifyMessagePipe
  value:
    type: Variant.Strategies.Core.ModifyMessagePipe, Variant.Strategies.Core, Version=1.1.0.0, Culture=neutral, PublicKeyToken=null
    replacements:
      MODIFY_MESSAGE_STRATEGY:
      CAN_EXECUTE_STRATEGY:
      EXECUTION_FLOW_STRATEGY:
      CAN_EXECUTE_EXPRESSION:
      INSTANCE_NAME:
      ACTIVITY_NAME:
      IS_ENABLED:
      CONTINUATION_POLICY: Default  # [Default | ReturnIfExecuted | ContinueOnNotExecuted | ContinueOnError | ReturnOnSuccess | ReturnIfNotExecuted]
      CONTINUE_ON_ERROR_EXCEPTION_NS: Exception
    # ... Additional settings removed for brevity
This pipe includes three core functional areas, which are common to most pipes:
- Strategy – Defines how to handle the
PushMessage, allowing different implementation types. - Execution Flow – Determines whether the pipe should run, and what to do afterward.
- Instrumentation – Optionally adds OpenTelemetry metadata to the execution context.
ModifyMessageStrategy Definition
This strategy modifies the LokiMessage, which is created in the connection and passed through each pipe.
- key: Variant.Core.ModifyMessageStrategy
  value:
    type: Variant.Strategies.Core.ModifyMessageStrategy, Variant.Strategies.Core, Version=1.1.0.0, Culture=neutral, PublicKeyToken=null
    replacements:
      VALUE:
      TEMP_VALUES:
      INSTANCE_NAME:
      NAMESPACE: Response
      APPEND_VALUE: False
      IGNORE_SUBSTITUTIONS: False
      FORCE_DEEP_COPY_OF_J_TOKEN: False
    # ... Additional settings removed for brevity
Specialisations
Pipe Specialisation
If you were to use these components in a pipeline without specialisation, it might look like this:
- pipe: Variant.Core.ModifyMessagePipe
  PUSH_MESSAGE_STRATEGY:
    strategy: Variant.Core.ModifyMessageStrategy
    VALUE: Hello world!!
    TEMP_VALUES:
    INSTANCE_NAME:
    NAMESPACE: Response
    APPEND_VALUE: False
    IGNORE_SUBSTITUTIONS: False
    FORCE_DEEP_COPY_OF_J_TOKEN: False
    LOG_ERRORS: True
  CAN_EXECUTE_STRATEGY:
  EXECUTION_FLOW_STRATEGY:
  CAN_EXECUTE_EXPRESSION:
  INSTANCE_NAME:
  ACTIVITY_NAME:
  IS_ENABLED:
  CONTINUATION_POLICY: Default
  CONTINUE_ON_ERROR_EXCEPTION_NS: Exception
Most of these values are defaults and automatically inserted by IntelliSense. You can simplify this to:
- pipe: Variant.Core.ModifyMessagePipe
  PUSH_MESSAGE_STRATEGY:
    strategy: Variant.Core.ModifyMessageStrategy
    NAMESPACE: Response
    VALUE: Hello world!!!
This can be simplified further by using a custom specialised pipe:
- key: Variant.Core.MyModifyMessageStrategyPipe
  value:
    pipe: Variant.Core.ModifyMessagePipe
    replacements:
      NAMESPACE: Response
      VALUE:
    defaults:
      PUSH_MESSAGE_STRATEGY:
        strategy: Variant.Core.ModifyMessageStrategy
Now the usage becomes:
- pipe: Variant.Core.MyModifyMessageStrategyPipe
  NAMESPACE: Response
  VALUE: HelloWorld
And we can specialise this further:
- key: Variant.Core.SetResponse
  value:
    pipe: Variant.Core.MyModifyMessageStrategyPipe
    replacements:
      RESPONSE:
    defaults:
	  VALUE!: RESPONSE
      NAMESPACE!: Response
Resulting in this final, clean invocation:
- pipe: Variant.Core.SetResponse
  RESPONSE: HelloWorld
These are examples of pipe specialisations, but Y# also supports process specialisations, where multiple pipes can be grouped and reused as a unit. We’ll cover those in a later section. For now, remember that specialisations are one of the most powerful constructs in Y#, enabling rapid creation of reusable, testable components.
[!Note] The differences between the defaults and replacements properties are explains [[#Code stack, replacements, defaults and pitfalls#Replacements & defaults|here.]]
Process Specialisations
Process specialisations occur when multiple pipes are combined into a single, callable pipe.
For example, suppose we need to send an email with an attachment, and all email requests must be placed on a queue. However, since attachments might be too large to fit within the queue message, we need a different approach. The solution is to write the attachment to blob storage and then place a reference link to it in the queue message.
Without using any process or pipe specialisation, the logic would look like this:
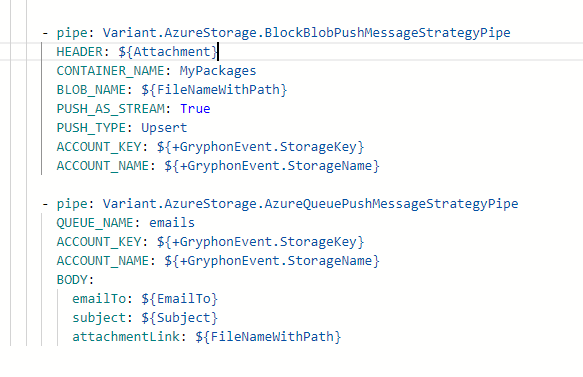
Instead, this can be encapsulated into a single specialised pipe:
 This specialised pipe can then be included in an extension package. In the future, anyone needing to send an email can simply add the extension to their project and use it like this:

Process Specialisations With Implementation Injection
As we saw above, we can inject specific values such as email addresses and paths into a pipe. However, it’s also possible to inject both specification pipes and process specification pipes within a process specialisation.
For instance, if we want to read a blob from Azure Storage, update its contents, and then write it back, we can define a general process for fetching and storing data—regardless of the specific document type being updated.
The example below demonstrates how this can be implemented and invoked:
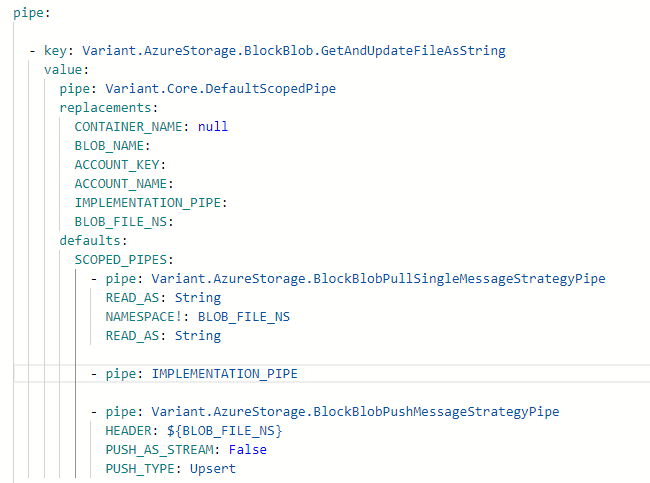
To use the above implementation, see below:

In practice, you could create another specification based on the Variant.AzureStorage.BlockBlob.GetAndUpdateFileAsString pipe shown above. This allows developers to apply specific updates to particular storage accounts:

This enables the user to call the pipe using the following:

[!Note] If the implementation pipe you want to inject contains multiple pipes, you can wrap it in a
Variant.Core.DefaultScopedPipeand assign your implementations to itsSCOPED_PIPESsetting.
Connector Specialisations
Connections, just like pipes, can be specialised. If you're using the default Azure Storage REST extension to read data from a queue, you would define it from scratch like this:
connections:
  - connector: Variant.Azure.Storage.Rest.Queue.TimerConnector
    DEFAULTS:
    ACTIVITY_NAME:
    DUE_TIME: 0:0:01
    POLLING_INTERVAL: 00:00:15
    STORAGE_ACCOUNT_NAME:
    QUEUE_AUTHORIZATION_PIPE:
    QUEUE_NAME:
    QUEUE_NUM_OF_MESSAGES: 32
    QUEUE_BATCH_SIZE: 8
    QUEUE_VISIBILITY_TIMEOUT_IN_SECONDS: 30
    QUEUE_MAX_DEQUEUE_COUNT: 2
    QUEUE_ITEM_NS: QueueItem
    QUEUE_ON_ERROR_HIDE_MESSAGE_FOR_N_SECONDS: 5
    QUEUE_DEAD_LETTER_PIPES: []
    QUEUE_PROCESS_PIPES:
      # Set Request header
      - pipe: Variant.Core.Simple.ModifyMessageStrategyPipe
        NAMESPACE: Request
        VALUE: ${QueueItem.MessageText.ConvertBase64ToString().ConvertStringToJToken()}

  # Do work here ...
If we look at the key: Variant.Azure.Storage.Environment.Queue.TimerConnector, which is part of a shared extension in a new project, we can see how it has been specialised to define the desired authentication and storage configuration:
  - key: Variant.Azure.Storage.Environment.Queue.TimerConnector
    value:
      connector: Variant.Azure.Storage.Rest.Queue.TimerConnector
      replacements:
        DEFAULTS:
        ACTIVITY_NAME:
        DUE_TIME: 0:0:01
        POLLING_INTERVAL: 00:00:15
        QUEUE_NAME:
        QUEUE_NUM_OF_MESSAGES: 32
        QUEUE_BATCH_SIZE: 8
        QUEUE_VISIBILITY_TIMEOUT_IN_SECONDS: 30
        QUEUE_MAX_DEQUEUE_COUNT: 2
        QUEUE_ITEM_NS: QueueItem
        QUEUE_ON_ERROR_HIDE_MESSAGE_FOR_N_SECONDS: 5
        QUEUE_DEAD_LETTER_PIPES: []
        QUEUE_PROCESS_PIPES: |2
              # Set Request header
              - pipe: Variant.Core.Simple.ModifyMessageStrategyPipe
                NAMESPACE: Request
                VALUE: ${QueueItem.MessageText.ConvertBase64ToString().ConvertStringToJToken()}
      defaults:
        STORAGE_ACCOUNT_NAME!: $[Environment.Storage.Name]
        QUEUE_AUTHORIZATION_PIPE!: { pipe: Variant.Azure.Identity.CreateEnvironmentCachedManagedIdentityTokenStrategyPipe }
Deeper Dive and Pitfalls
Code Stack
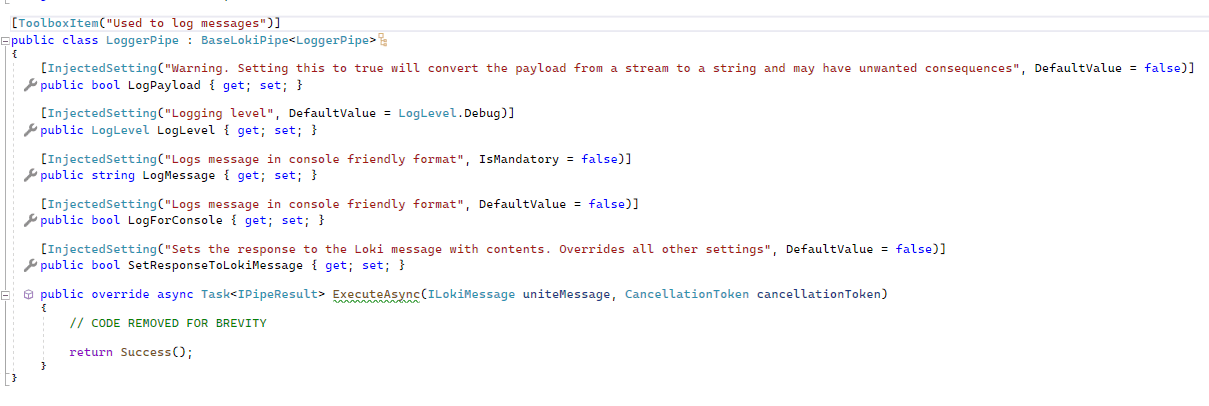
Before diving into replacements and defaults, it helps to understand how pipes, strategies, and connectors are transformed into executable code. All pipes and strategies are resolved into .NET code, as shown below:
The assemblies that contain this code are uploaded to the platform, which then generates the following YAML configuration:
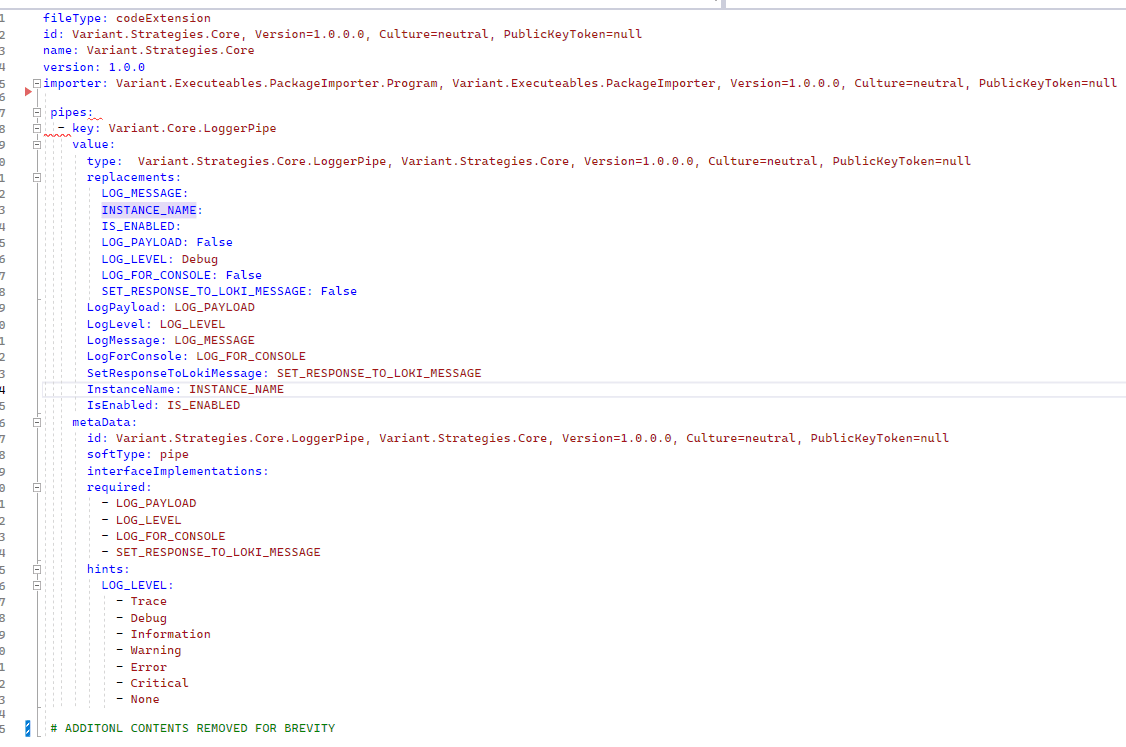 As seen before, multiple specialisations can then be created from this YAML:
 These specialisations, defined using replacements and defaults, are then used to instantiate the C# code with all relevant values.
Replacements & Defaults
When creating specialised pipes, settings can be applied using either replacements or defaults. The difference between them is how the editor handles them:
-
Replacements: These appear in word-completion suggestions. If a replacement value is deleted, the editor will fall back to the default.
-
Defaults: These values are still settable, even if not shown in completions. This includes shared pipe settings like
LOG_ERRORS,IS_ENABLED,EXECUTION_FLOW_STRATEGY,INSTANCE_NAME, etc.
Pitfalls
Since replacement values can override values from higher-level pipes, care must be taken—especially with commonly named properties like NAMESPACE, which could lead to unintended overrides.
To prevent this, you can append an exclamation mark (!) to the end of a setting name. This ensures the value cannot be overridden. For example:

By adding ! to ACCOUNT_NAME and ACCOUNT_KEY, these settings remain fixed and won't be overridden by any parent pipe configuration.